How to Engrave Dog Tags & Jewelry on a Cricut
[videojs youtube=”http://www.youtube.com/watch?v=aIPsZXsymk8″]
Get my free Cricut dog tag and jewelry engraving templates at https://jennifermaker.com/cricut-maker-engraving-tool-metal/
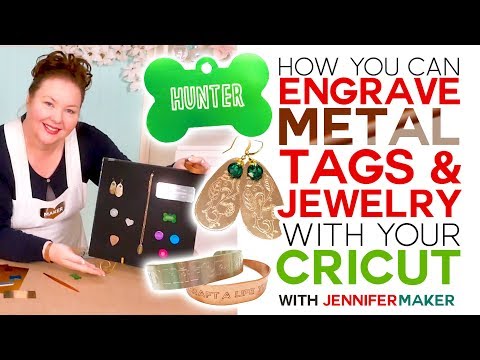
Learn how to use the Cricut Maker engraving tool on metal to personalize anodized aluminum dog tags and charms, copper and aluminum bracelets, and brass earrings and pendants! Plus, I share my tip on how to center your design on your metal surface every time!
The new Cricut Maker tools include an engraving tool that I am SO excited about! And when I asked all of you for what projects you most wanted to engrave, you told me dog tags, bracelets, and earrings! And that is exactly what my first projects with the Cricut Maker engraving tool are — bright and colorful anodized aluminum dog tags and charms, pretty copper bracelets, and a lovely brass drop earrings and necklaces. I literally opened up the package, put the tool in my Maker, loaded up a mat with a blank, and engraved it!
MATERIALS LIST (contains my affiliate links):
* Cricut Maker – see http://shrsl.com/1ruwv
* Cricut Engraving Tip – see https://amzn.to/2HxLPyY
* Cricut QuickSwap Housing (you already have this if you have the Scoring Tool) – https://amzn.to/2NHhvWc
* Purple StrongGrip Mat – https://amzn.to/2HnK9b0
* Painter’s Tape or Masking Tape
* For Dog Tags: Anodized Aluminum Bone Shape Double-Sided Tags (14 gauge or higher) – https://amzn.to/2KUuu57
* For Charms: Anodized Aluminum Discs (14 gauge or higher) – https://amzn.to/3218bR1
* For Bracelets: Copper Bracelet Blanks (Tapered) https://amzn.to/323oGfy or Copper Bracelet Blanks (Thin) https://amzn.to/2ZrzbaO or Anodized Aluminum Bracelets (Thin) (14 gauge or higher) https://amzn.to/340trrM
* For Bracelets: Bracelet Bending Bar – see https://amzn.to/2KUQ09Y
* For Earrings and Necklaces: Brass Drops https://amzn.to/2HpjOtf or Brass Pendants (14 gauge or higher) https://amzn.to/2ZtVZKZ
* (Optional): Jewelry Kit by Swarovski Crystals – https://fxo.co/1164423/swarovskicharms
* (Optional) Enamel Marker – https://amzn.to/2MTBsax
* For Plaques: https://amzn.to/2LqGE4W
* My free SVG cut file (available at https://jennifermaker.com/library )
UPDATES/CHANGES: Check for any updates, changes, or additional videos for this project at https://jennifermaker.com/updates
It’s important to note that your metal needs to fit in your Maker, and that means it cannot be very thick, as it needs to fit on a mat and under the engraving tool. My research shows that the thickest metal you can reliably engrave on is 14 gauge, which is 5/64th or .078 of an inch. That’s LESS than 1/8th of an inch. If you aim for something between 1/16th and 1/8th of an inch, you should be right on target. Of course, that means no corrugated metals or metals with other indents or reliefs.
Step 1: Get my Engraving Templates
This step is optional, but it’s really helpful to have a template of what you’re engraving so you can properly size it. I’ve made an engraving template of the projects I engraved in this tutorial, but you can also just use the Shape tool in Cricut to make circles, ovals, squares, and rectangles in the shape of your engraving blank.
Step 2: Create or Find a Design For Your Engraving Blank
If you’d like to just put text on your metal dog tag, charm, or bracelet, it’s simple! Click the Text tool, type the text you want to appear, and pick a font.
Now resize the text to fit the engraving blank you intend to use. Note that you may want to change the letter spacing so the letters are closer together, especially if you choose a cursive font as I did. If you need finder control over your text, select it, click on More, then Advanced, then Ungroup to Letters, and then you can manually move each letter into place until you are happy (when you’re done, be sure to select all of those letters and click Attach).
Step 3: Change Your Design Linetype to Engrave (and HIDE your Templates)
Once you have a design made, make sure it is all attached with itself and then go to the Linetype menu and change it to “Engrave.”
You also need to HIDE the template so that the ONLY thing you see is the design you want to put on your engraving blank. To hide a layer, select it and click the Eye icon next to its name in the layer panel on the left.
#cricut #cricutmade #engraving
I appreciate every subscriber. It’s free and easy to subscribe — just click here: http://bit.ly/sub2jennifer
Follow me at:
Blog: https://jennifermaker.com
Facebook Page: https://www.facebook.com/jennifermakercrafts
Facebook Group: https://www.facebook.com/groups/cricutcraftersandmakers/
Instagram: https://www.instagram.com/jennifer.maker
Pinterest: https://www.pinterest.com/jenuinemom
Please subscribe to my channel at https://www.youtube.com/c/jennifermaker for more video tutorials to craft a life you love!
Credits:
Introduction: PixelBytes (my child!)
Music: Cute by Bensound (licensed, royalty and copyright free)
Videography: Jennifer Marx on a Panasonic Lumix FZ-1000 DSLR 4K camera
Design: A Jennifer Maker original!

