Cricut Pens: Writing and Envelope Addressing Tutorial
[videojs youtube=”http://www.youtube.com/watch?v=08b_7mOd19E”]
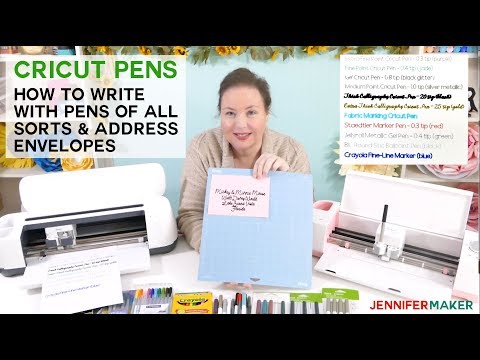
Learn how to use pens in your Cricut to make gorgeous handwritten gifts and even address envelopes and invitations Cricut writing is so much easier than you might think!
Find the full written tutorial here: https://jennifermaker.com/cricut-writing-tutorial-tips-tricks-fonts/
Your Cricut is more than a cutting machine … it’s a crazy powerhouse of a writing machine! If you love the handwritten look but hate your handwriting. Just pop in a pen, set your design to “Write” in Cricut Design Space, and click that Go button. But it’s not really THAT easy, is it? I’m going to share you all of my Cricut writing tips, tricks, and font ideas so you can get compliments on your handwriting, too!
Materials List (contains my affiliate links):
Ultimate Pen Adapter Set https://rstyle.me/n/cwb7y6cbznf
Extra Fine Point Cricut Pen – 0.3 tip
Fine Point Cricut Pen – 0.4 tip https://amzn.to/2FmDTh1
Glitter Gel Cricut Pen – 0.8 tip https://amzn.to/2ALACo9
Medium Point Metallic Cricut Pen – 1.0 tip https://amzn.to/2FmwfDv
Thick Black Calligraphy Cricut Pen – 2.0 tip https://amzn.to/2FmSVUj
Extra Thick Gold Calligraphy Cricut Pen – 2.5 tip https://amzn.to/2CZp5aO
Washable Fabric Marking Cricut Pen https://amzn.to/2FmKB6Z
Staedtler Marker Pen – 0.3 tip (non-Cricut pen) https://amzn.to/2meRYVd
NOTE: Reader are reporting these pens are NO LONGER FITTING!
Gelly Roll Metallic Gel Pen – 0.4 tip (non-Cricut pen) https://amzn.to/2CMa4Fc
BIC Round Stic Ballpoint Pen (non-Cricut pen) https://amzn.to/2CYin3T
Crayola Fine-Line Marker (non-Cricut pen) https://amzn.to/2COBr15
UPDATES/CHANGES: Check for any updates, changes, or additional videos for this project at https://jennifermaker.com/updates
Once you have created some text in Design Space, it’s time to actually get your Cricut to write it out for you.
Your Cricut comes with two tool clamps — clamp A and clamp B. Clamp A is for accessories, and this is where we can put pens. To insert a pen, simply open clamp A and insert the pen tip down while holding up on the bottom. If you’re inserting a Cricut pen, you’ll know it’s in when in place because you will hear it click and the arrow will disappear. Be sure to close the clamp once the pen is in.
Tip: Always test your pens on a scrap piece of paper before you use them in your Cricut. If they are new, they may need to be primed a bit to get the ink going, so you’ll want to do that BEFORE your Cricut uses them on your project.
When you’re ready, load your mat and press the Go button to begin writing. For my writing text, I set most all of these pens to write in the same “writing” font called Dear John, which is a Cricut font that is a part of Cricut Access. The only two that aren’t in the Dear John font are the two calligraphy pens, which are in Emiline, also a part of Cricut Access.
Finding the writing fonts that look good on the Cricut can be tricky. Your best bet is to use the fonts in Cricut Design Space that are designated as “writing” as they won’t create “bubble” letters when the pen tries to outline a standard font. When searching for fonts, just click the “Filter” label on the far right then select “Writing” from the drop-down menu—now Cricut will only show you fonts that are good for writing with pens.
Now, what if you find a font you love but it’s not available as a writing font? There is a way to turn it into writing if you really want! You can create text from it in Inkscape or Illustrator by tracing the text you want with a single vector line, which is what is needed for a proper writing font. So if you feel comfortable using Inkscape or Illustrator, trace your text in that pretty font and save it as an SVG file to upload to Cricut Design Space.
One thing to note is that to get this pretty look with your Cricut writing, I used one of the advanced features of Design Space. I selected my text, clicked Advanced, and then chose “Ungroup to Letters.” This allowed me to move each letter individually so I could position it where it looked best. When done, just select all of the letters and click Attach.
If you’d like to learn more about Cricut, check out my Cricut Coach Playbook, filled with over 65 printable one-page diagrams that show you how to do all the popular tasks in Cricut Design Space!
http://www.cricutcoach.com/
#cricut #cricutmade #designspace
============
Follow me at:
Blog: https://jennifermaker.com
Facebook Page: https://www.facebook.com/jennifermakercrafts
Facebook Group: https://www.facebook.com/groups/cricutcraftersandmakers/
Instagram: https://www.instagram.com/jennifer.maker
Pinterest: https://www.pinterest.com/jenuinemom
Please subscribe to my channel at https://www.youtube.com/c/jennifermaker for more video tutorials to craft a life you love!
Credits:
Introduction: PixelBytes (my child!)
Music: Playful (licensed, royalty and copyright free)
Videography: Jennifer Marx on a Panasonic Lumix FZ-1000 DSLR 4K camera
Design: A Jennifer Maker original!
