T-Shirt Ruler Guide for Perfect Vinyl & Sublimation Placement | Free Rulers + Directions!
[videojs youtube=”http://www.youtube.com/watch?v=fEN5i7EFotE”]
Get my free T-shirt ruler guides at https://jennifermaker.com/t-shirt-ruler-guide
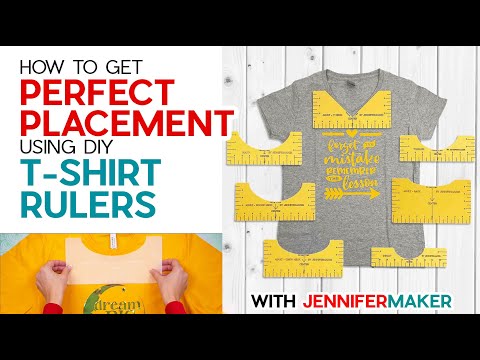
Custom T-shirts are so much fun to make, but how do you get the design placed perfectly? Too high or too low and they just don’t look right! Not to worry, you can make your own T-shirt ruler guide for any kind of shirt from infant to adult! After all, making your own tools and project accessories is one of the best parts of being a Cricut crafter! I’ll show you how to make them out of either cardstock or plastic (wait ’til you see what we’re using!) and how to use them with my free ruler patterns. Your new T-shirt rulers will work for any of my custom T-shirt projects, whether it’s iron-on vinyl, sublimation, or even screen printing!
I appreciate every subscriber. It’s free and easy to subscribe — just click here: http://bit.ly/sub2jennifer
Correct placement can be the difference between success and sadness for T-shirt projects! If you get it wrong, the design might be hard to read or uncomfortable to wear. Not to fear, you can make the perfect T-shirt alignment tool using your Cricut! I’ll show you how to use my free SVGs to make a t-shirt ruler guide out of cardstock or plastic.
Which should you make? It depends on your different needs!
If you make the paper version in premium quality cardstock like the kind in my material list, it will hold up for many uses. It might be easier to use if you have vision trouble since we’ll draw the markings on top using a Cricut pen before cutting it on a StandardGrip mat.
But if you might need to see the fabric’s surface during alignment — like if you’re using a patterned shirt — or plan to make A LOT of shirts, the chopping mat version is easier to make than you might think and extremely durable. It actually just takes a fine-point blade and StrongGrip mat!
Once you’ve made a T-shirt ruler guide tool, how do you use it?
The video shows you, but basically you place your T-shirt ruler on your vertically creased T-shirt. You don’t want it on the edge of the collar of the t-shirt, but on the seam. Then, place the top of the similarly creased design right at the bottom of the ruler (though sometimes it goes higher or lower, I’ll show you in the video!). This is extra helpful if your design doesn’t have a uniform top edge. You’ll get consistent alignment on multiple shirts using my T-shirt ruler guide collection!
My example shirts use one layer, but for extra help on vinyl alignment in a more than one piece design, check out my tutorial on How to Layer Vinyl.
MATERIALS LIST (contains my affiliate links):
View my Amazon shopping list with the exact items we used to make this project at https://a.co/id1omjo
To make a cardstock T-shirt alignment ruler, you will need:
* 110 lb, 8.5″ x 11″ Cardstock in a color that will stand out on shirts – https://amzn.to/3cxVM1R
* Fine-tip pen – https://amzn.to/3CzAbiz
* 12″ x 12″ StandardGrip Machine Mat – https://amzn.to/3f0qoKe
To make the plastic T-shirt ruler guides, you will need:
* 11″ x 14″ plastic chopping mats, which you can purchase from the Dollar Tree website at https://shrsl.com/3o2xr
-or- on Amazon – https://amzn.to/3RHJQJp
* 12″ x 12″ StrongGrip Machine Mat – https://amzn.to/3f0qoKe
And for either version, you want:
* A way to cut your T-shirt rulers and vinyl. I used the amazing Cricut Maker 3 but you can also use the original Maker or an Explore series machine with the Fine-Point Blade – see https://jennifermaker.com/which-cricut-should-i-buy/
Measuring tape – https://amzn.to/3CAPlEt
, scissors, weeding tool, and brayer.
To make the custom t-shirts, you’ll also need:
* A shirt of your preference – I tried several with good results including an Adult Unisex crew neck – https://amzn.to/3B0NQQ8 , a Cotton Ladies V-Neck, a Youth T-Shirt, baby onesies, and a sweatshirt
* Iron-on vinyl – I used Cricut Everday Iron-On in yellow at https://amzn.to/3cAnFXb and Holographic Iron-On in red and cobalt – https://amzn.to/3dZV6me
* An appropriate heat press – I used my EasyPress 2 – https://amzn.to/3wJtZCB
Design #433 (My free T-shirt ruler guide SVG/PDF/DXF design files and example decals available in my free resource library at https://jennifermaker.com/library )
#cricut #cricutmade #designspace
============
Follow me at:
Blog: https://jennifermaker.com
Facebook Page: https://www.facebook.com/jennifermakercrafts
Facebook Group: https://www.facebook.com/groups/cricutcraftersandmakers/
Instagram: https://www.instagram.com/jennifer.maker
Pinterest: https://www.pinterest.com/jenuinemom
Please subscribe to my channel at https://www.youtube.com/c/jennifermaker for more video tutorials to craft a life you love!
Credits:
Introduction: PixelBytes (my child!)
Music: Cute by Bensound (licensed, royalty and copyright free)
Videography: Jennifer Marx on a Panasonic Lumix FZ-1000 DSLR 4K camera
Design: A Jennifer Maker original!
