How to Make a Summer SVG in Cricut Design Space
Want to make a summer design in just minutes, even if you have no design skills, Hi, I’m Shanice from Hypnotic Lamber Design s a self-taught designer helped in crafters, just like you tap into and master their creative ability in Cricut Design Space, Even if you’ve never designed Anything before Tonight, I will teach you how to create a simple summer. Design.Everything I’m covering tonight is something you can take action on immediately.
When you leave this class, you will know exactly what you need to do to make your own custom, design and design space Make sure you watch until the very end to get access to a special copy of the high quality. Ready-To-Cut no clean up required summer cut file that you see on the screen completely for free, So go ahead and drop a comment. Please, let me know down below if you are watching here with us, live Drop, a # live!
If you’re new drop a # new or if you’re watching with us on the replay, please drop a # replay. This engagement helps me reach more people, just like you, So three of the biggest myths that people believe when it comes to making their own designs. Are They think that they have to be a professional, Whether that’s they’ve had formal training through a university or they have a degree or they use professional software.Tonight? You will see how you can use Cricut Design Space to make yourself a design pretty quickly simply and easily and completely for free
The next myth is that they believe it takes too much time. You will see here together how you can make yourself a design in less than 30 minutes, And the last thing is, they think it’s too complicated to learn.They think designing is difficult, but you will see here that this is something that is very easy and that can Be accomplished even if you have no design skills, So by the end of this class, you will be able to save yourself time.
Stop wasting your time scrolling through thousands of Facebook group dumps just to find a file that you like and end up, not even finding exactly what you want. Save yourself money Forget having to pay someone to create a fault for you or to buy one off of Etsy. Have your own custom file created in minutes And save yourself frustration.
No more dealing with low quality files that require cleanup Create yourself a ready to cut no cleanup required in just minutes. So, let’s make sure you’re in the right place. This class is for you, if you are tired of searching through hundreds of SVG jumps in your Facebook. Groups.You frequently can’t find a file. That is exactly what you want, or you spent way too much time, converting or cleaning up a free image. You found on the internet or Facebook only for not to be usable or not work at all.
Alright, So let’s get started making the summer design Just give me one moment: I’m going to switch into Cricut Design Space and we will go ahead and get started. Alright,
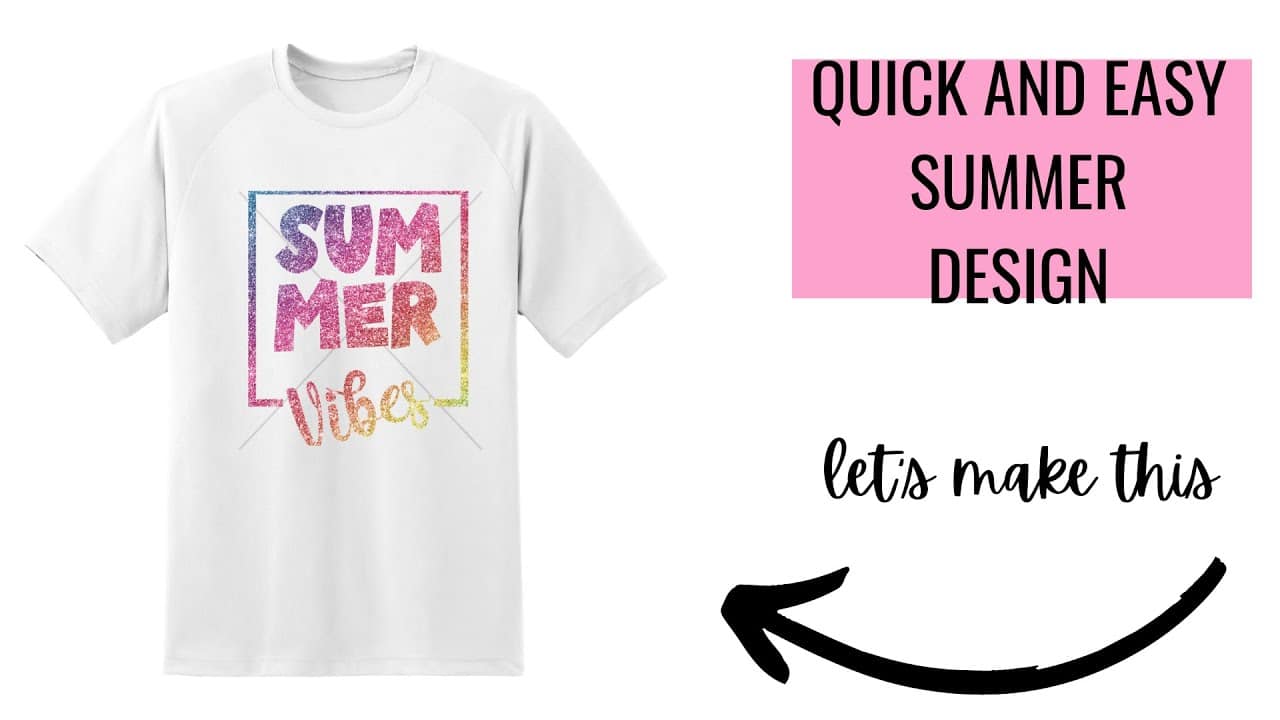
So the image we’re going to be recreating tonight is this summer vibes that you see here on the upper right-hand corner of the screen So to get started. Let’S go ahead and go to our shapes tools, So go to shapes and we’re going to click on the square.Shape And we’re just going to make that bigger just by expanding it with this arrow here on the bottom right corner.
And we’re going to duplicate this, This is to make frame. So we want to make this one a tad bit smaller and then we want to align them So we’ll select, all and then align center, and now we can cut out the frame So select them both again.
Hit slice get rid of what we don’t want, We’ll pull this one off to the side for one second, because we are going to use that to make our cutout. So, let’s just go ahead and shrink it down a bit and then align this horizontally And then we’re going to slice and then delete what we do not need.
Waited too much Okay, there we go Now we have our frame So now it’s time to put in our text. Okay, so let’s go to our text tool here and the font I’m using is BFC slate cookies.
If you’re interested in that particular font, just let me know by dropping a # font below and I will send you the link to that. So let’s go ahead and type in our summer and let’s change its line spacing so they’re, not so far: spaced We’ll decrease it, And now let’s expand this to a hit, fill up the border. Okay, that looks good. Let’S go ahead and select both of them and then we’re going to align horizontally again to get that right in the middle
So now it’s time to add in the vibes, So let’s go back to our text tool and pick our script font Type in Vibes to make that bigger and then just rotate. It
Counterclockwise Stretch this Okay and then let’s align this in the center Okay. So now we have that Let’s go ahead and select all weld it together. Okay,
So now we have our design.So. The next thing we’re going to do is we’re going to add or we’re going to slice out a texture. In this case it’s going to be a glitter texture, So I already have that uploaded. So let me just go back to it: insert it onto the canvas
And this is just a rainbow glitter texture that I downloaded If you’re interested in that just type a # rainbow in the comments and I’ll get you the link to that. Also, Okay, let’s decrease this size, because this is way too big. Okay, there we go Now. We can make it bigger,
Alright, Now, let’s go ahead and line these up, We’re lining up the actually, let’s make it a little bit smaller. Well, that’s fine! Let’S put this on top, so we can see Make sure we cover everything which we did
So let’s go ahead and select both of them Align center They’re, both still selected.So, let’s hit slice. Let’S make this a little smaller, so we can see our work.
Okay, so now in this design is great, as is, but the glitter just adds a little bit of a fun touch, So there you see, we have this, which this is great, also too, but this is what I really wanted. Was this glitter here. So that is how you can slice out a texture or a pattern on your image, all great, So that one was pretty simple. Let me just switch back here to the presentation for one moment:
You know what We’ve got a little bit more time here. There’S one more thing: I want to show you So I’m going to go ahead and do that So before we switch back to the presentation, let’s go ahead and just make this smaller. So we can get these out of our way.
I want to show you how to make some more fun summer designs with with some summer-inspired elements. So Let me pull that up. Okay Also, I want to show you how to create this image here. No one likes a shady beach. So first thing is: let’s go ahead and get these glasses, and these glasses are a design that I made in Cricut Design Space just using the shapes
Let me go ahead and get this the glasses, so then we can. I can show you how to make this one, Oh, and let me make sure I get back into Cricut Design Space here, so you can actually see what I’m doing Okay. So this is the next design that we’re going to create here. So I already have the glasses pulled. Up.Let’S make this just a tad bit bigger
So the glasses, like I said I made this in Cricut Design Space. Actually, So let’s go ahead and get the palm trees. That was actually a free image that I got from Cricut Design Space, which are these ones right here. So I’m going to add that Let’s change this to white, so we can actually see the difference.
Let’S enlarge it, Let’s tilt it a little bit to fit within the lens. Okay! Now we’re going to duplicate that because we want another one for the other one, So we’re just going to duplicate that
We’Re going to flip it to the other side.Put it on the other lens within the other lens, I’m trying to make sure I get it all in there without cutting any of it off. So I got ta make it a little bit smaller, so it’ll fit Okay! That looks good
Let’S adjust this one a little bit, so it fits within the frame. Okay. So now we’re going to weld these two pieces together, the two palm trees and then we’re going to slice them out of the glasses So select, both the new welded palm trees and the glasses and then hit slice. That was just everything we do not need.
Okay, So this one I could’ve, went down just a little bit more on that, But you get the idea. So this one is the rest of it.It’s, pretty simple.
It’S just some text, So let’s go ahead and add the text Move this down just a little bit: Okay, Let’s go ahead and align this all up.
And then just change it to color black and then weld all that together. Okay, now it’s all more piece! Alright! So do you see how simple that was? Do you see how easy it is to make your own custom creations and Cricut Design Space
So now let me switch back to my presentation and I will share with you a few more of these summer-inspired images. Okay, so, like I was saying now, do you see how easy it is to create your own designs for a completely free Right here in Cricut Design Space.How? Would you like to make even more custom-made summer designs right here at Cricut Design, Space using ready to cut no clean up required images Just like the ones you see below? Well, you can do that with the help of my summer. Svg starter bundle.
So, with this starter bundle, I made every single image that you see here below by putting together shapes and making these free elements within Cricut Design Space. So so thank you for sticking around until the end, So as a fast-action bonus in addition to the free summer, SVG that I showed you at the beginning of the presentation, which is actually a completely separate bonus from this.What. I have here, for you tonight is the Summer SVG starter bundle, So this particular bundle has twelve summer-inspired images, All the ones you see here on the screen.
So we have the starfish, the bird, the sea wave, the the seashell, the bubbles, the pineapple, the lemon slice, the sun, the watermelon, the popsicle and the drinking glass. Those are all included in this bundle And what this is. These are elements that were made exclusively in a Cricut Design Space using free elements. So this is not something that you will have to pay a cricket access for, or anything like that. This is something that you just have access to the design space project link and it’s right there on your canvas. So, in addition to this bundle, there’s also a commercial license included to make physical products with the designs that you create with these files.
So, like I was saying what makes this unique is: it has 100 % Cricut Design Elements, As you see here, on the left-hand side of the screen. So there’s no cricket access required.There’s, no uploading required of any of these images. There is no conversion or cleanup required of any of these images.
So that saves you ton of time You can get right to your project, start creating and then cut it out and go with your project. So now that I’ve shown you how you can make your own custom creations in Cricut Design Space, it’s time to put your training and these bonuses to work, Spend less time on design and more time crafting with the summer. Svg starter bundle Stop spending time searching through hundreds of SVG dumps for that perfect fall and stop spending a bunch of money to get that SUV, that’s kind of sort of, but not exactly what you want.
So this particular bundle is actually a 60 value. However, for you joining me here tonight, I am offering it for the very low price of just $ 5. However, this is a fast-action bonus, So this is only available for the next few minutes. After you access the link, So once the time is up, the special price expires and it goes up to nine dollars.
So if you are interested in that, just please type a # starter bundle in the comments, and I will get you the link to that. So again, here’s everything you’re getting today It says 3, It’s actually five, That was a typo
You’Re getting all 12 of these summer-inspired images within the Cricut Design Space Program And also you’re getting a commercial license to sell physical products made with these designs. Alrigh t.. So that’s it for the bundle And as promised, I do have that high quality ready to cut
No cleanup required summer fall, So if you are interested in that, please just drop a # summersh TV below. So this is like. I said this is a file that you can just literally just put into your Read More Cricut Bright 360 Floor Lamp, Unboxing & Review.
Read More: ❗️ Cricut Design Space 2022
