How to Decorate Glass Blocks with Lights and Vinyl (with your Cricut!)
[videojs youtube=”http://www.youtube.com/watch?v=p7ImMxlAn2I”]
Get my snowy window design (Design #127) free at https://jennifermaker.com/decorated-glass-blocks-vinyl-lights/
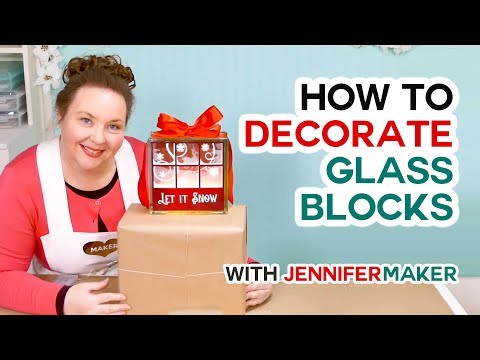
Decorated glass blocks make beautiful home decor as well as wonderful gifts and memorials. Learn how to choose, prepare, decorate, and light them up in this tutorial.
NOTE: Cricut Design Space updated shortly after I made this video. To see those updates and make the necessary changes for this tutorial, please watch https://youtu.be/jVpzDmz5ago
Materials list (includes my affiliate links):
– An 8″x8″ glass block with a pre-drilled opening – get them at https://amzn.to/2SR96yL
– Vinyl, self-adhesive – https://amzn.to/2Els7pe
– (Optional) LED lights – https://amzn.to/2LeCHQ4
– (Optional) Fiber fill, fake snow, sand, marbles, or anything else you may want to put into your glass block
– A way to cut your materials (I used the amazing Cricut)
– My free SVG/DXF/PDF cut files/patterns (Design #127) (available in my free resource library—get the password at the bottom of this post)
– The font I used in the tutorial is called Roland Emerald and you can get it from https://fontbundles.net/deadlock-studio/118502-roland-emerald/rel=mnGwRS
UPDATES/CHANGES: Check for any updates, changes, or additional videos for this project at https://jennifermaker.com/updates
Key concepts taught in the video tutorial include how to weld, how to reposition things on a mat, and how to weed and apply vinyl.
I love anything with lights in these cold, dark months, and that includes lighted glass blocks! These glass blocks with pre-cut holes have been popping up in the craft stores lately, and you may be wondering how you can use them. Decorated glass blocks are particularly popular around the holidays, but are also used year-round as memorials and to mark special occasions. They are also just a fabulous way to show off a pretty vinyl decal!
You can get these glass blocks at craft stores for about $12-15. Now you CAN also get glass blocks from home improvement stores, but they often do not have a way for you to get inside. And getting inside to put lights and decorations is one of the best things about a glass block! You can put little LED lights like these inside the blocks, or even stuff them filled with fake snow, some fiber fill, or even sand.
When you get a glass block, look for one with a smooth surface. The bumpy ones are harder to decorate. And you can decorate them in a lot of ways — many people paint them, but I think most people put vinyl decals on them. The glass is the perfect surface for self adhesive vinyl and there’s so many different ways you can do it.
For my glass block, I designed a snowy window. You can see the snow building up on the panes and the snowflakes are swirling about. And I took advantage of the glass to put an extra layer of vinyl on the BACK of the block, so when you look through the window, you see a forest scene. I designed this so YOU can decide how many snowflakes and what sort of forest scene you see through the window, as I’ve provided extra snowflake designs as well as a Santa sleigh and a snowman for you to decorate with.
I put “Let it Snow” on the front, but you could personalize this with your own name or saying. I’m going to show you how to do all of this, as well show you how apply your vinyl to the glass.
I hope you can see just how many possibilities there are for decorating these glass blocks now! I struggled a bit to come up with just one design. I actually had to refrain from going back to the craft store to buy more glass blocks just so I could decorate them differently! I’m not even kidding. When I mentioned at dinner that I was thinking of going back to get more glass blocks, I got THE LOOK. You know, the “don’t you have enough craft supplies already?” look. Haha, just kidding … Greg is amazingly supportive of me and my craft habit!
Learn more about The Great Maker Show and Tell at https://jennifermaker.com/showandtell
#cricut #cricutmade #designspace
I appreciate every subscriber. It’s free and easy to subscribe — just click: http://bit.ly/sub2jennifer
Prefer to get my updates and free project patterns delivered straight to your e-mail inbox? Subscribe to my free newsletter at https://jennifermaker.com (scroll to the bottom)
========
Find me online at:
Follow me at:
Blog: https://jennifermaker.com
Facebook Page: https://www.facebook.com/jennifermakercrafts
Facebook Group: https://www.facebook.com/groups/cricutcraftersandmakers/
Instagram: https://www.instagram.com/jennifer.maker
Pinterest: https://www.pinterest.com/jenuinemom
Please subscribe to my channel at https://www.youtube.com/c/jennifermaker for more video tutorials to craft a life you love!
Credits:
Introduction: PixelBytes (my child!)
Music: Cute by Bensound (licensed, royalty and copyright free)
Videography: Jennifer Marx on a Panasonic Lumix FZ-1000 DSLR 4K camera
Design: A Jennifer Maker original!
