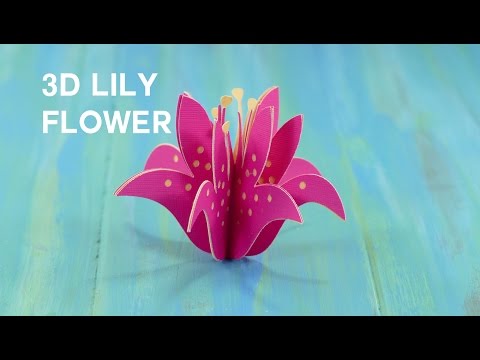
3D Lily Flower Tutorial – Cricut's Hopping Down the Bunny Trail Cartridge
[videojs youtube=”http://www.youtube.com/watch?v=a7fzWco0Wvk”]
How to assemble the 3D Lily Flower from the Hopping Down the Bunny Trail Cartridge (#M2194539) available in Cricut Access.
I appreciate every subscriber. It’s free and easy to subscribe — just click here: http://bit.ly/sub2jennifer
MATERIALS LIST (contains my affiliate links):
– 65lb – 80 lb. card stock (solid core paper works best) — this is my favorite paper for making paper flowers https://amzn.to/2tf8kAT and Cricut Pearl Paper https://amzn.to/2MXMpHL makes a pretty paper flower, too!
– Hot glue gun and glue sticks (or tacky glue https://amzn.to/2rmCRNF if you don’t have a glue gun)
– A way to cut your paper flowers (I used the amazing Cricut – http://shrsl.com/1dq4w)
– Cricut’s paper flower pattern (learn exactly how to find them in step 1 below) — note that you will need to either purchase this flower OR have a Cricut Access subscription
HOW TO MAKE THE 3D LILY FLOWER
STEP 1: FIND THE LILY FLOWER IN CRICUT DESIGN SPACE
There are TWO ways to find this 3D Lily Flower:
1. Go to Cricut Design Space, click on Images and search on the ID “#M2194539”.
2. Go to Cricut Design Space, click on Images, click on Cartridges, search on Hopping Down the Bunny Trail, click on the cartridge, and select the correct Lily design.
STEP 2: CUT OUT YOUR CRICUT LILY
STEP 3: ASSEMBLE YOUR LILY
STEP 4: GLUE YOUR CRICUT 3D LILY
#cricut #cricutmade #designspace
============
Follow me at:
Blog: https://jennifermaker.com
Facebook Page: https://www.facebook.com/jennifermakercrafts
Facebook Group: https://www.facebook.com/groups/cricutcraftersandmakers/
Instagram: https://www.instagram.com/jennifer.maker
Pinterest: https://www.pinterest.com/jenuinemom
Please subscribe to my channel at https://www.youtube.com/c/jennifermaker for more video tutorials to craft a life you love!
Credits:
Introduction: PixelBytes (my child!)
Music: Playful (royalty and copyright free)
Videography: Jennifer Marx on a Panasonic Lumix FZ-1000 DSLR 4K camera
Design: Cricut
